


















Installation and the settings page
You install WebP and AVIF Everywhere like any other PrestaShop module. It starts with safe defaults: it writes its server rules where it can, and the setup steps on the Overview take you through the rest in a few minutes.
Install from the Module Manager
- Download the module’s zip file from your PrestaShop Addons account. Do not unzip it.
- In your back office, open Modules › Module Manager.
- Click Upload a module (top right) and select the zip file, or drop it into the window.
- Wait for the message Module installed! and click Configure. The settings page opens on the Overview, with the setup steps.
In the list of modules, the module is named WebP and AVIF Everywhere, by PrestaChamps, in the category Administration; its technical name is webpgenerator.
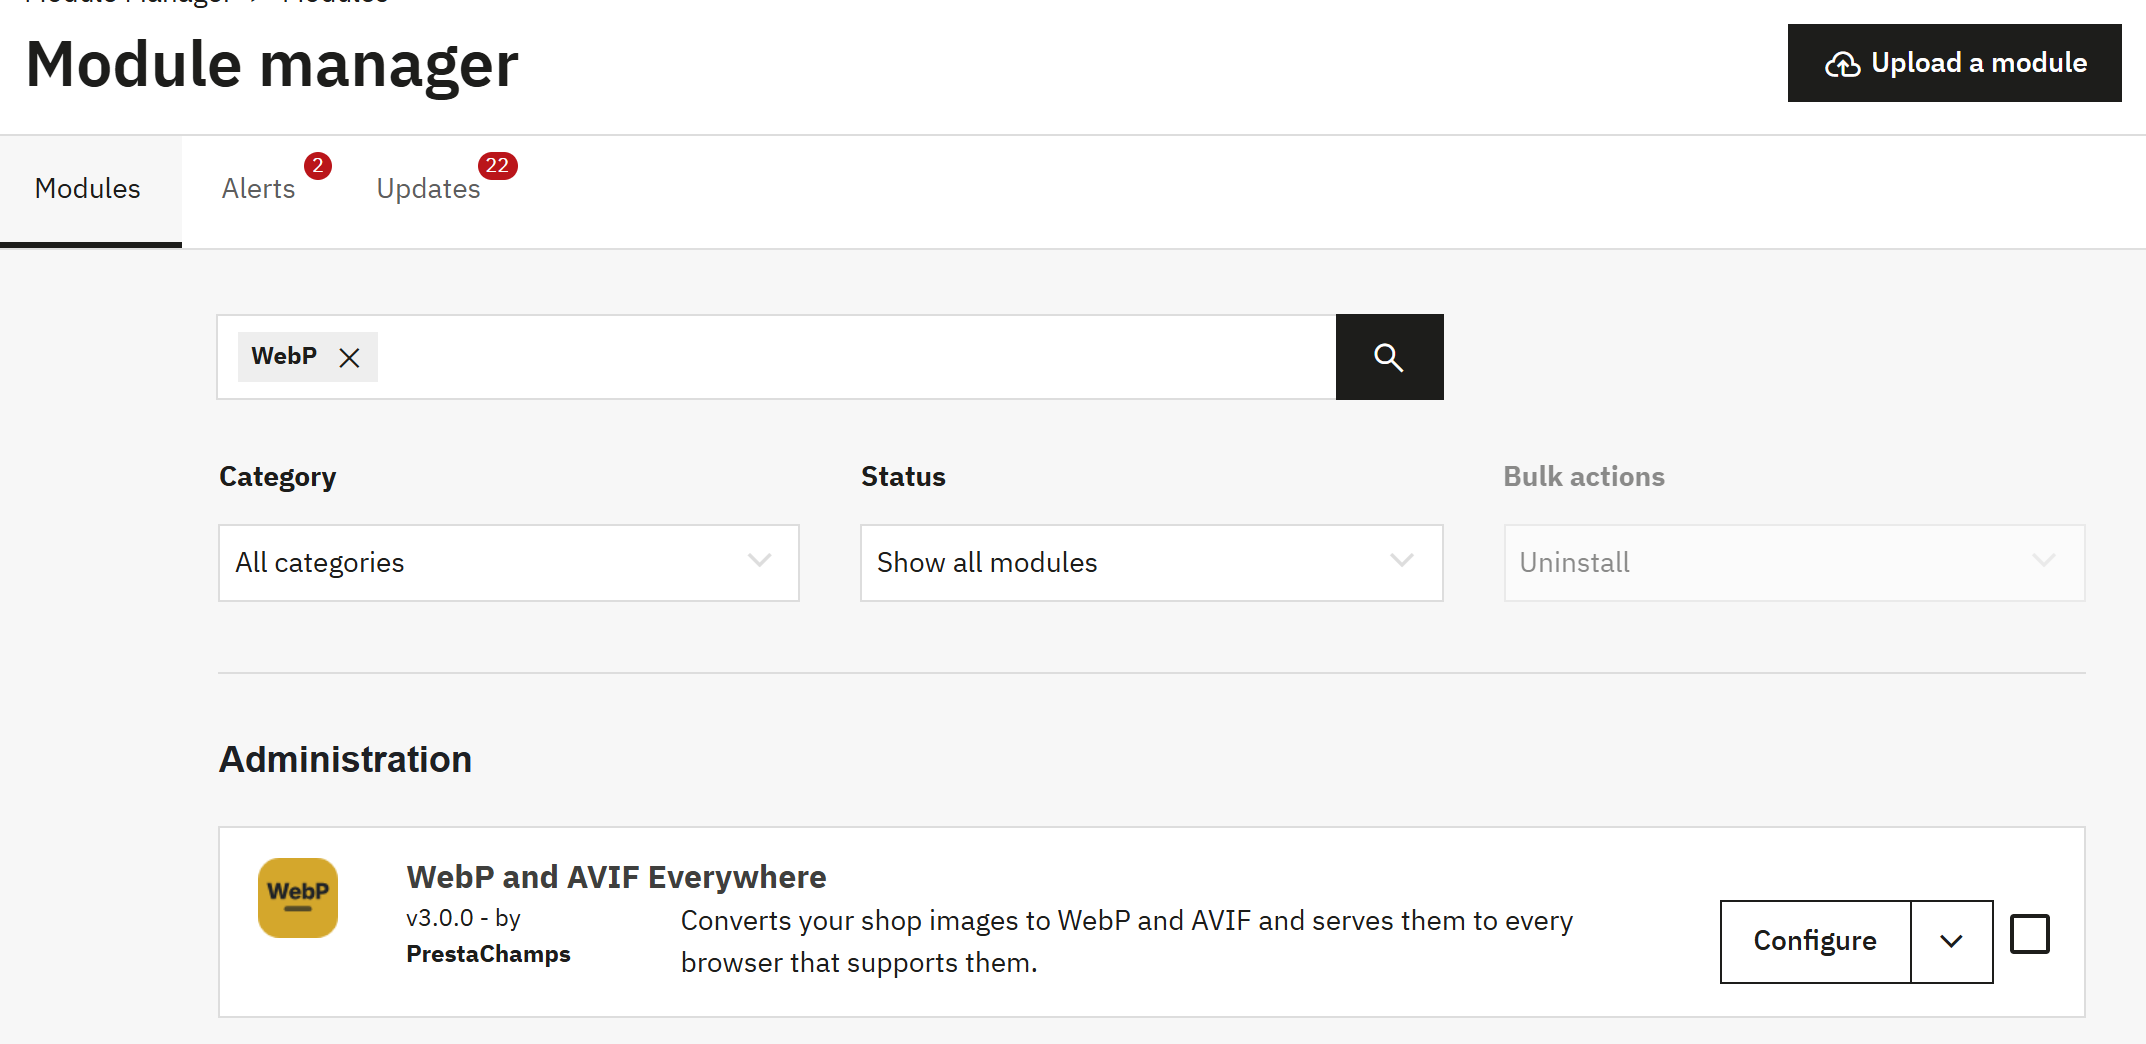
- Upload a module opens the upload window.
- Configure opens the module’s settings page.
If you are upgrading from version 2 of the module, upload the new zip the same way and read Upgrade from version 2.
Install by FTP when the upload fails
If the upload stops with a size error, or nothing happens for a long time, your host limits the size of uploads.
- Unzip the file on your computer. You get a folder named
webpgenerator. - With your FTP or SFTP program, open the folder where PrestaShop is installed (it contains
config,modules,themesand so on). - Upload the whole
webpgeneratorfolder intomodules, so that you getmodules/webpgenerator. - In the back office, open Modules › Module Manager, search for “WebP” and click Install in the row of WebP and AVIF Everywhere, then Configure.
What the installation sets up
- The menu entry Design › WebP and AVIF images, which opens the settings page.
- A few database tables: the list of your images with the state of their copies, the results of the checks and, later, the list of optimised originals.
- The module’s data folder
var/modules/webpgenerator/, where it keeps the backups of your.htaccessfile and, if you use them, the backups of optimised originals. - The server rules at the top of the shop’s
.htaccessfile, after a backup, when the file can be written. If it cannot, the Overview says so under Notes from the installation, and the shop addresses use Sources in the page until the rules are in place (Delivery). - A first look at each shop address, to notice a CDN such as Cloudflare in front of it.
The installation converts nothing by itself. The conversion starts with the first conversion run: Convert now in Convert images, the cron task, or the back-office conversion, which converts a few images every minute while you have the back office open.
Default settings
| Setting | Default after installation |
|---|---|
| Create WebP copies | On, quality Balanced (80) |
| Also create AVIF copies | On when the server can create AVIF, quality Balanced (50) |
| Keep a copy only when it saves at least | 5 % |
| Kinds of images | All on: catalogue, CMS, theme and module images, and the shop logo |
| Modules whose images are converted | Banner and Image slider |
| Preferred engine | Automatic (the best engine of your server, then the next) |
| Delivery mode of each shop address | Automatic (Addresses of your shop) |
| Lazy loading and Main image first | On; Images loaded at once: 2 |
| Missing width and height | Off |
| Convert while the back office is open | On |
| Pause after each image (gentle mode) | Off |
| Optimise originals | Off |
The settings page at a glance
Open Design › WebP and AVIF images, or click Configure in the Module Manager. Every section of the module has the same frame: the dark header with the module’s name, its state and its main buttons, the dark menu of sections on the left and the open section on the right.
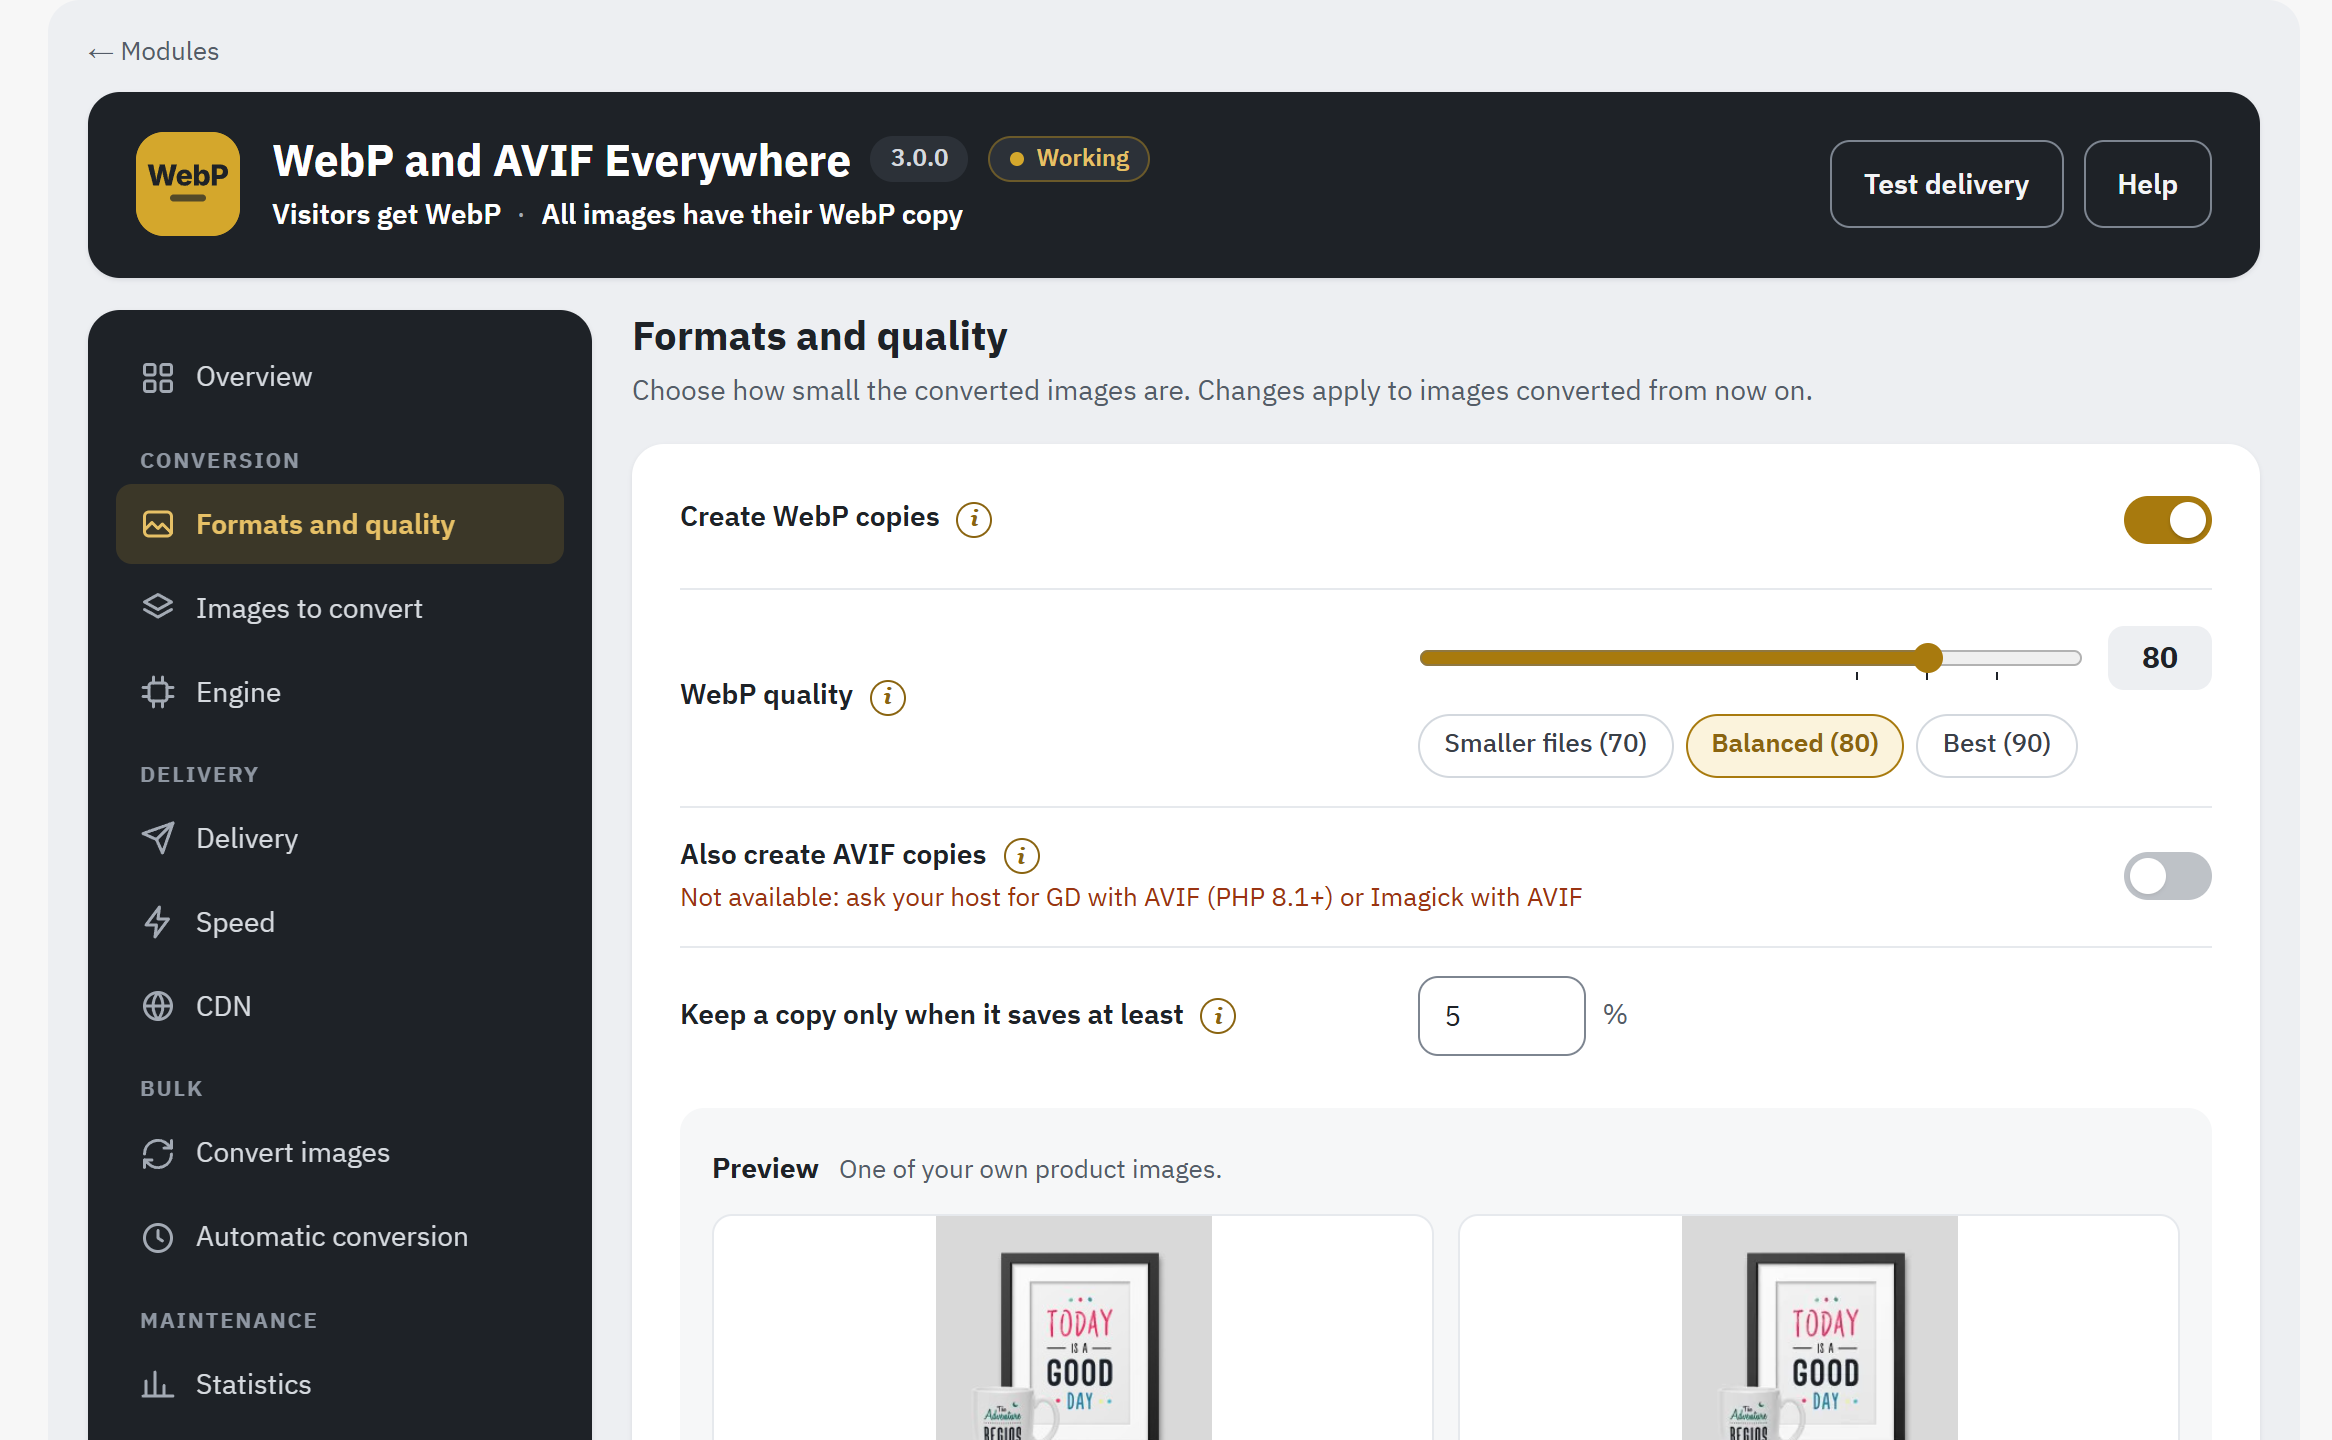
- Modules goes back to the Module Manager.
- The state of the module, next to its name and version (The header: state and facts).
- At most three short facts: what your visitors get, whether your images have their copies, and what needs a look.
- Test delivery opens Delivery, where the delivery test checks what your visitors get (Test delivery).
- Help opens the guides, support and version.
- The menu of sections, each with its icon, grouped by task.
- A help button: it explains the setting next to it.
The header answers at a glance whether the module works:
- The state badge, next to the version: Working, Needs attention: 1 (the number of checks of the Overview that need attention; click the badge to see them), Paused, Not working or Off in this shop.
- Under the name, at most three facts, for example Visitors get WebP · All images have their WebP copy. A fact in orange or red needs a look. The header: state and facts explains the states and the facts.
- Test delivery and Help are always there. Test delivery turns gold, as the main button, when no image waits for a copy and delivery needs a test: it was never tested, or the last test found that visitors get JPG or broken images.
- Create missing copies appears, in gold, while images wait for their copies. It opens Convert images (Convert images); the number in brackets is the count of images still waiting (none right after the installation, before the images are listed). Once every image has its copies, the button is gone.
Next to a setting or the title of a card, the round button marked i shows what it does and its default; click it again to hide the text.
The menu groups the sections by task; the Overview comes first, on its own. The section you are in is marked in gold:
| Group | Section | What you do there |
|---|---|---|
| Overview | Overview | The setup steps at first; then whether everything works, the key figures and the checks (Overview: the answer and the checks) |
| Conversion | Formats and quality | WebP and AVIF on or off, quality, preview (Formats and quality) |
| Images to convert | Which kinds of images get copies (Images to convert) | |
| Engine | The program that creates the copies, test conversion (Engine) | |
| Delivery | Delivery | How each shop address sends the copies, delivery test, server rules (Delivery) |
| Speed | Lazy loading, main image first (Speed) | |
| CDN | CDN in front of the shop, Cloudflare (CDN) | |
| Bulk | Convert images | Progress per kind of image, Convert now, failed images (Convert images) |
| Automatic conversion | Cron address, back-office conversion, last runs (Automatic conversion) | |
| Maintenance | Statistics | Download size saved, PageSpeed, disk space (Statistics) |
| Compare | Original, WebP and AVIF side by side (Compare) | |
| Clean up | Copies no longer needed (Clean up) | |
| Originals | Optional: smaller original files, backups (Originals) | |
| Help | Help | Guides, short answers, support, version (Help and support) |
Each section saves with its own Save button, and the result appears in the section itself. When something cannot be done, the message says why and how to fix it; a few messages add Details are in Advanced Parameters > Logs.: the full entry is in Advanced Parameters › Logs, where the module’s messages start with WebP Generator:.
Employees whose profile may only view the page see the settings with the notice You can view these settings; changing them needs the Edit permission. (Permissions of employees).
First setup in five steps
Right after installation the Overview shows five setup steps. Each step checks one thing and offers the button that does it. Most shops are done in a few minutes; converting a large catalogue goes on in the background afterwards.
During the setup the Overview shows only the step bar, the current step and, under it, the Checks card, folded: Show all checks opens every check of the module. The answer at the top, the key figures and the Automatic conversion panel appear once the setup is finished or skipped (Overview: the answer and the checks). Meanwhile the header’s badge often reads Needs attention: 3 and its facts name what is not done yet, such as Delivery not tested yet: they change as you go through the steps.
The bar at the top shows where you are: Step 1 · done, Step 2 · now, and so on. A step your shop already meets is marked done, and now is always the first step left to do. Under each step:
- Next: Choose the quality (with the name of the next step left) moves on; on the last one the button is Finish the setup. You can move on even when a check of the step is not green yet, and come back later.
- Back to step 1 goes back to an earlier step.
- Skip the setup, show all settings closes the steps. Reopen the setup steps, at the bottom of the Checks card, opens them again.
Step 1: Check the server
The module needs an engine on your server that creates WebP copies; AVIF is a bonus. The step shows four checks:
- A conversion engine works, or The conversion engine is not tested yet: Test at the end of its line, like Open the engine settings under the checks, opens Engine; click Test conversion there (Test conversion). The step is done once a test conversion has passed.
- PHP fileinfo extension is loaded: it helps to recognise image types. Without it, the module reads the type from the file itself.
- The AVIF check: AVIF is on (with the engine that creates it), AVIF is off or AVIF is not available on this server. Without AVIF, your images get WebP copies.
- This shop can reach its own address (This shop’s own address is not checked yet until you check it): the delivery test opens your shop’s pages from the server, so the server must reach the shop’s public address.
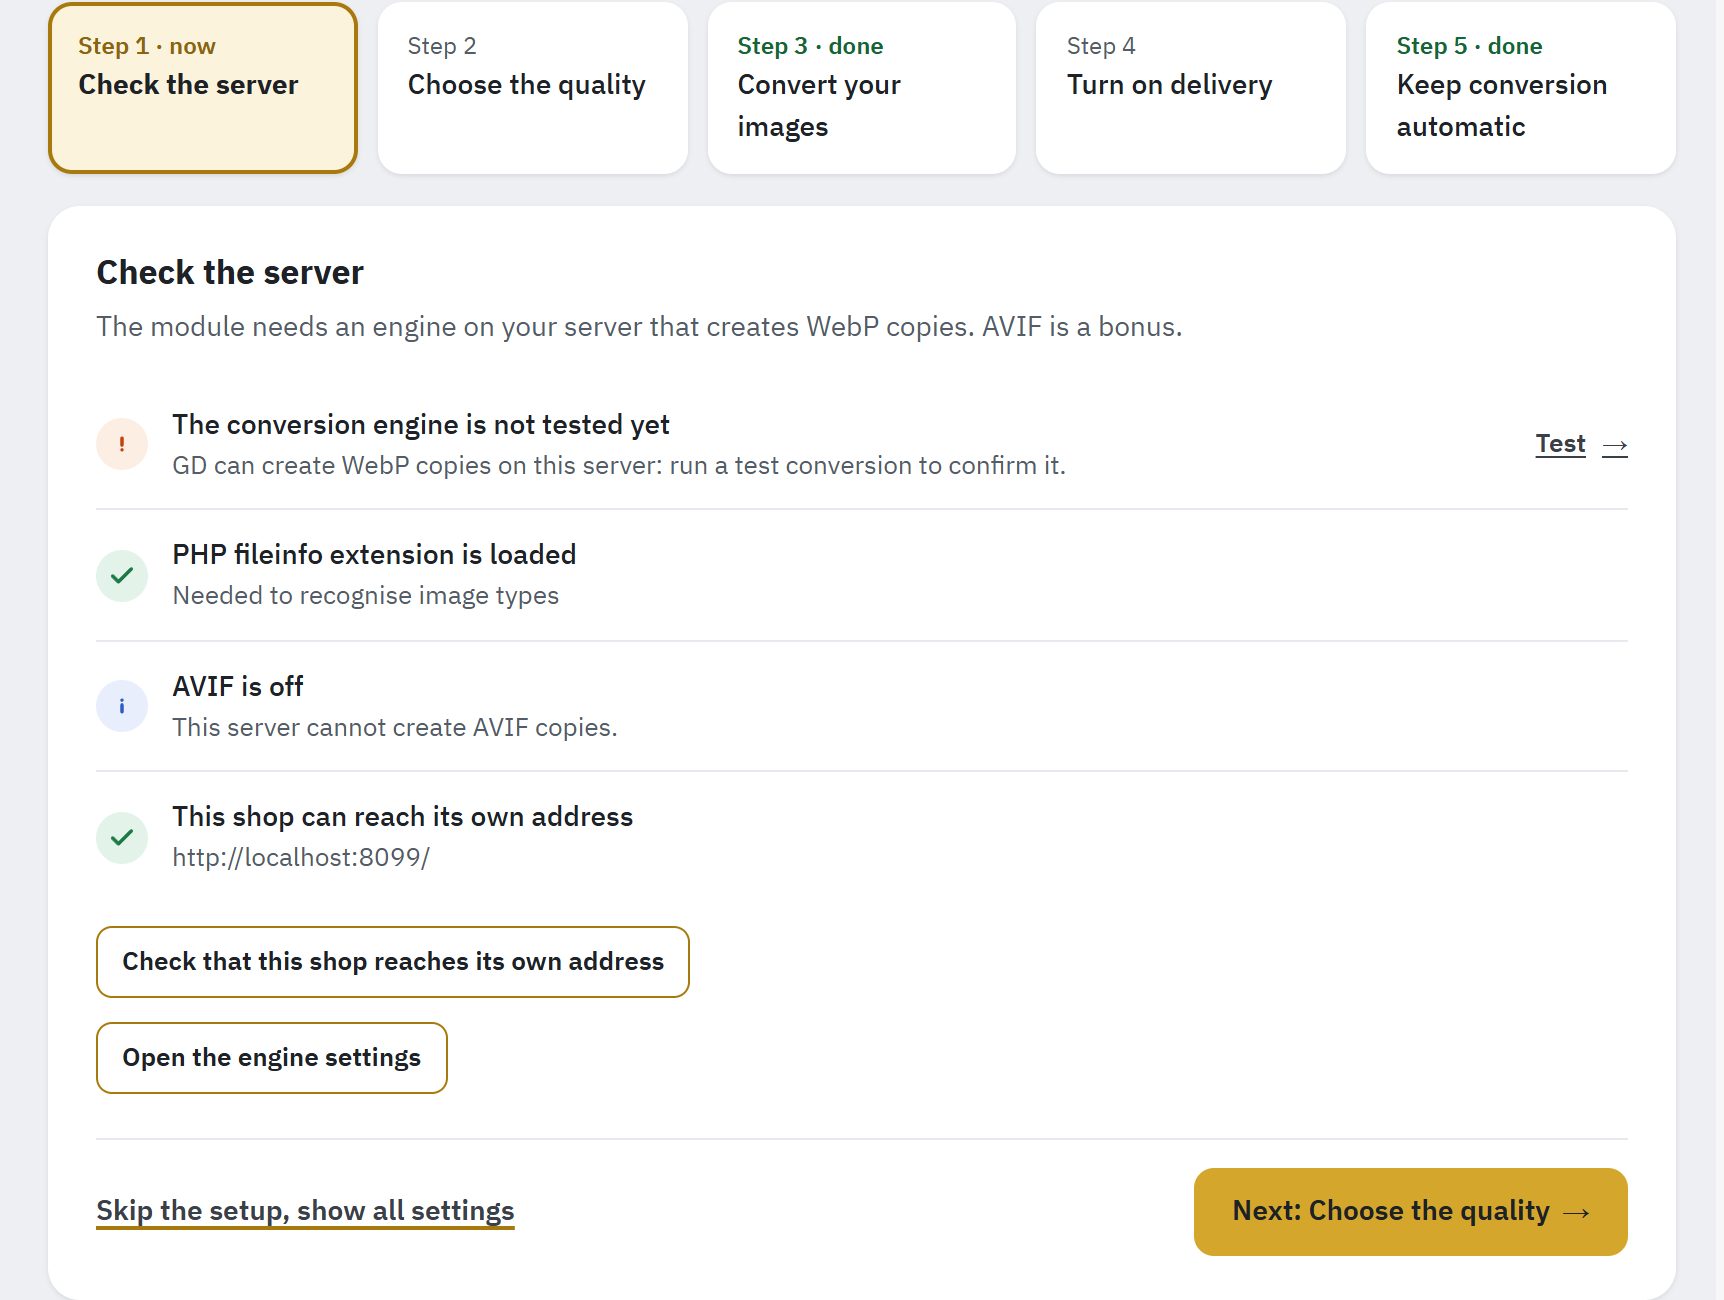
- The step bar: done, current and next steps.
- The checks of this step, each with its result.
- Check that this shop reaches its own address runs the address check.
- Next: Choose the quality moves to the next step.
Click Check that this shop reaches its own address. Some hosts and Docker set-ups cannot reach their own public address but answer on a local one: the check then reads This shop reaches its own address only through 127.0.0.1:8080, and the step offers a button Use 127.0.0.1:8080 for the checks. Click it, and the tests use that address from then on (the Connect to setting, Advanced); the check reads The checks reach this shop through 127.0.0.1:8080. A test made that way cannot see a CDN in front of the shop.
Step 2: Choose the quality
How small should your images be? The step shows the same image three times, at each quality, with the file sizes. It uses one of your own product images (or a category image, or a sample image when your shop has none yet).
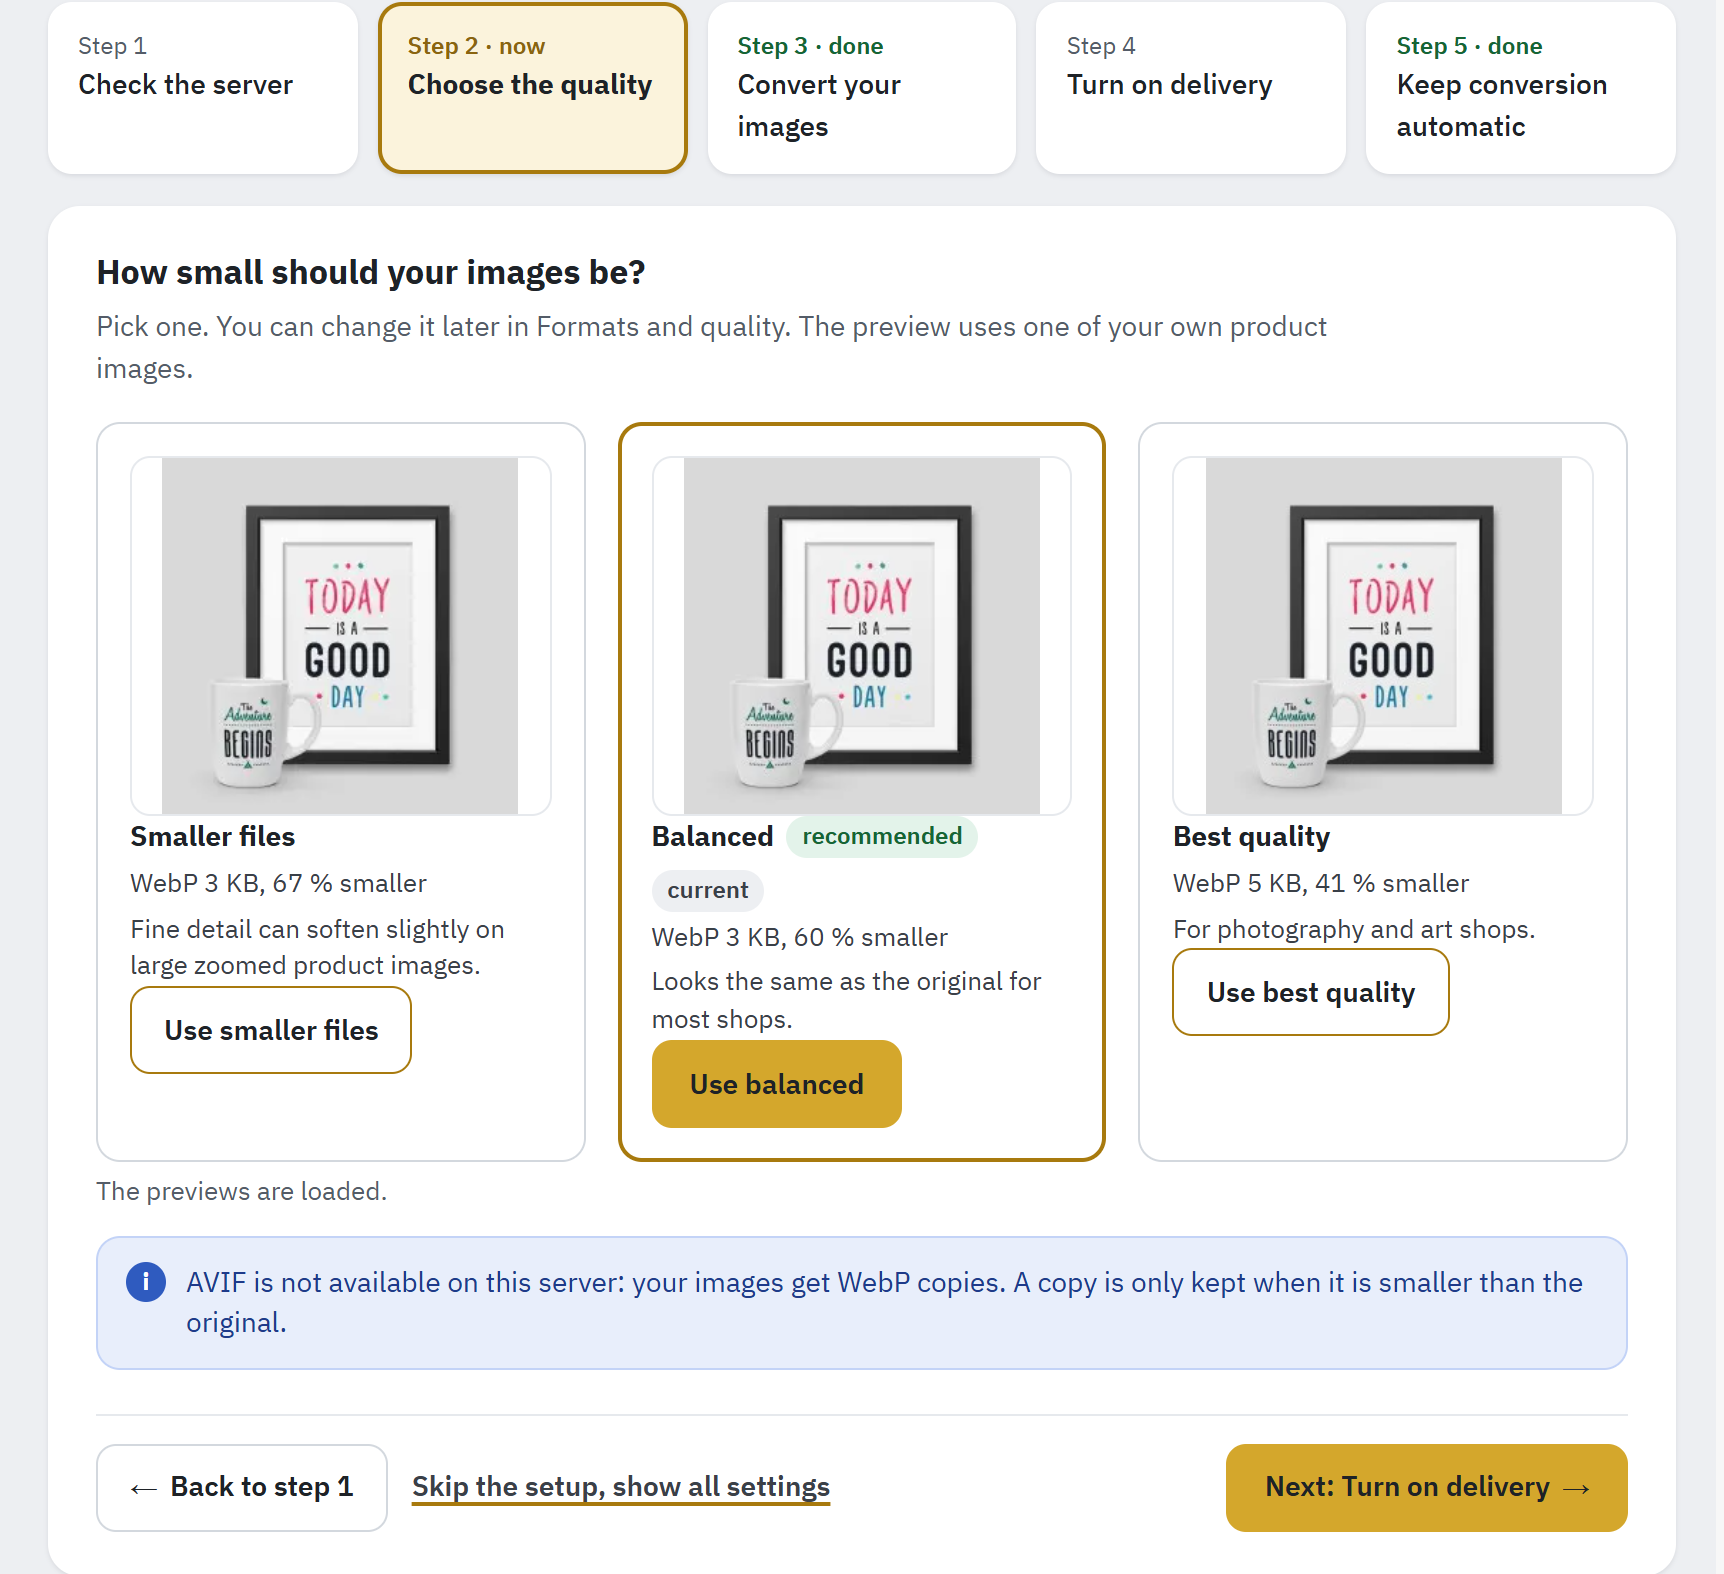
- The preview of one of your images at that quality.
- The size of the WebP copy and, when AVIF is on, of the AVIF copy.
- Balanced is recommended: it looks the same as the original for most shops.
- The button that chooses this quality.
| Choice | WebP / AVIF | When to choose it |
|---|---|---|
| Smaller files | 70 / 40 | The smallest pages. Fine detail can soften slightly on large zoomed product images. |
| Balanced | 80 / 50 | Looks the same as the original for most shops. |
| Best quality | 90 / 60 | For photography and art shops. |
Click Use smaller files, Use balanced or Use best quality. The choice is saved at once (Quality saved: WebP 80, AVIF 50.) and the setup moves on. The pill current marks the quality your shop uses now. You can change it later in Formats and quality (Formats and quality). Whatever you choose, a copy is only kept when it is smaller than the original.
Step 3: Convert your images
The module creates the copies of the images already in your shop, a few at a time. The step says how many images are still waiting, for example Images waiting for their copies: 1,250, or Every image has its copies. Before the first run it reads The first conversion run lists the images of your shop. The step is done when 95 % of your images have their copies.
- Click Open Convert images.
- Click Convert now and keep the page open: the table fills up as the copies are made. The first run also lists the images of your shop.
- You may leave the page at any time: the copies made so far stay, and the automatic conversion goes on with the others (Automatic conversion).
Step 4: Turn on delivery
Browsers that support WebP or AVIF get the copies at the same image addresses, through the server rules. The step lists your shop addresses, each with the way it sends its images (server swap or sources in the page) and what its last test found, for example localhost:8099 · server swap · not tested yet.
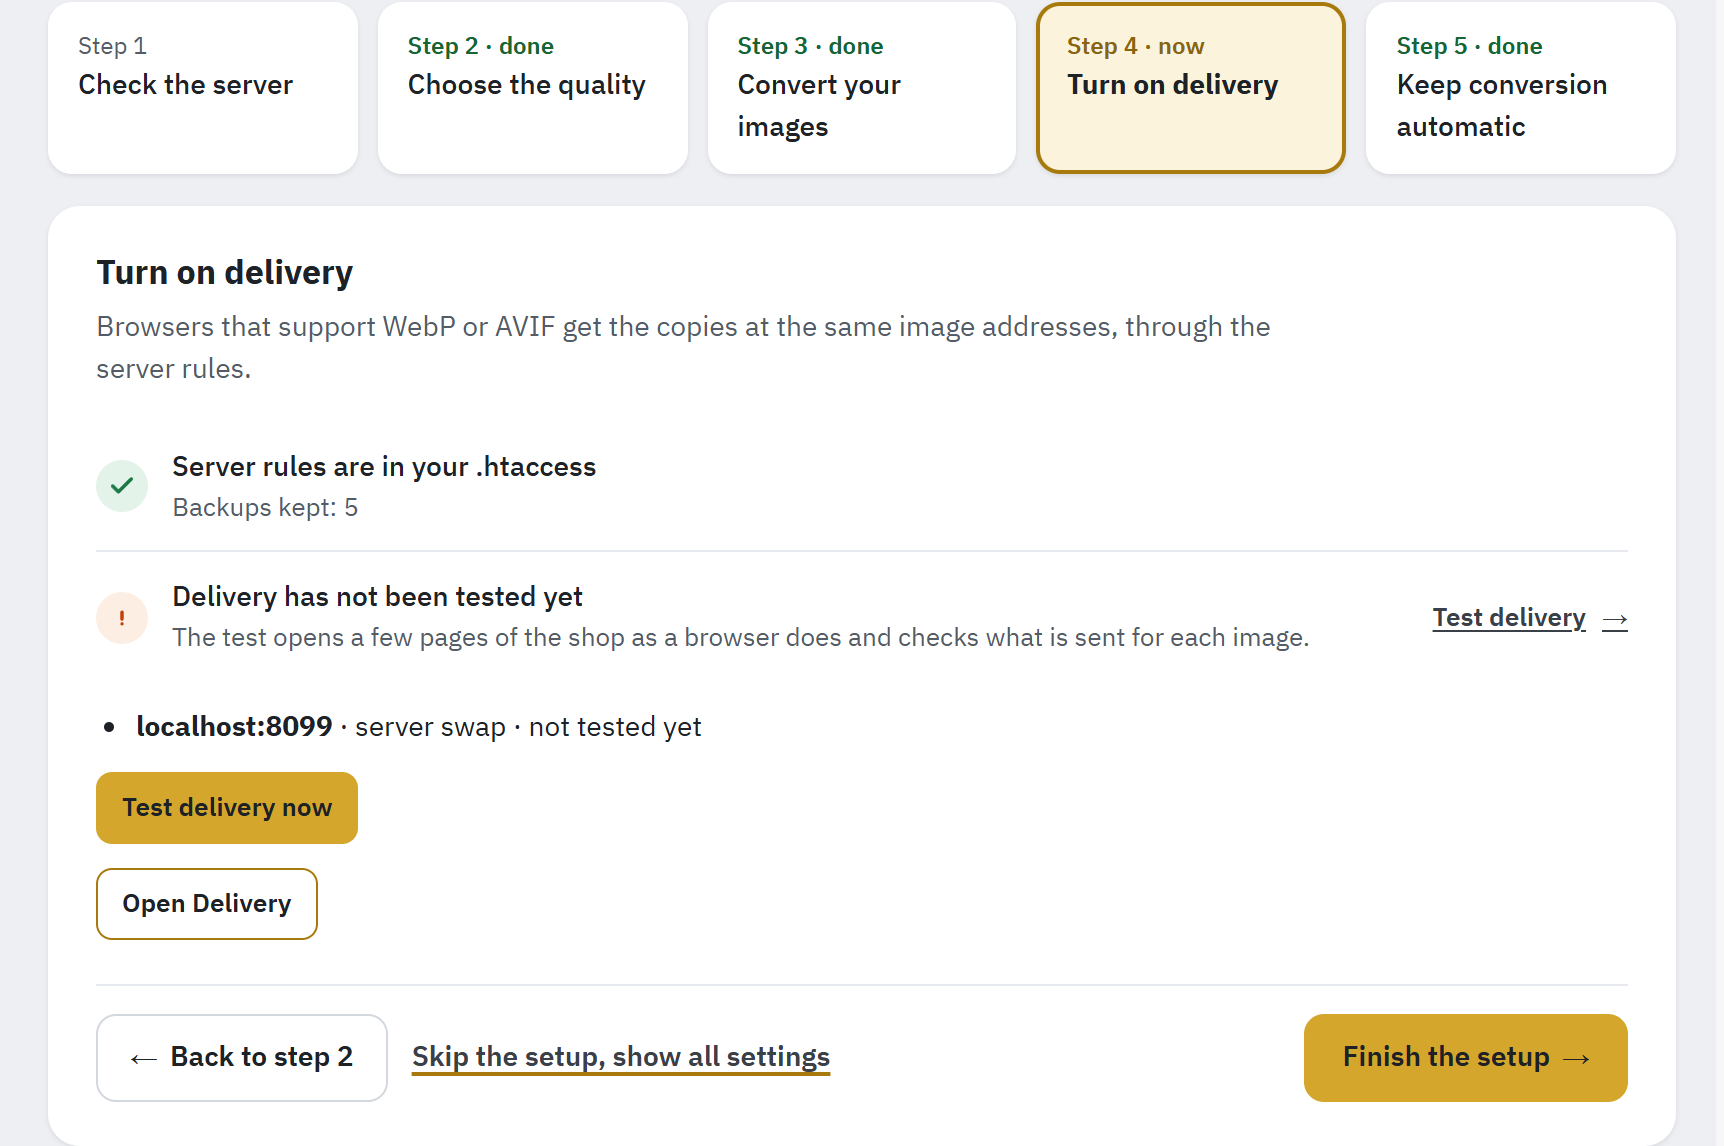
- Each shop address, how it sends its images and what its last test found.
- Test delivery now starts the delivery test.
- The checks of this step: the server rules and the delivery test.
- Click Test delivery now and keep the page open until the bar is full. If you leave the page, click Test delivery now again later: the test starts again.
- When the test is over, the page reloads. A test that passed completes the step: the bar marks it done and shows the next step left (or the setup closes). In the checks, the delivery check names what your visitors get: Visitors get WebP, or Works on your server when the test could only run inside your server. That completes the step too, but a CDN in front of your shop was not checked.
- When the step stays open because something needs a look, click Open Delivery: the answer there says what your visitors get, and the details say, image by image, what was sent and why (The answer).
On nginx, the rules are not written by the module: copy the configuration shown in Delivery into your server first (nginx configuration). Until then your addresses use Sources in the page, which works without any server rule.
Step 5: Keep conversion automatic
Images you upload from now on are converted at once. For the others (an import, a new theme, images copied by FTP) the module needs regular conversion runs. The step checks both:
- New images are converted when you upload them.
- Automatic conversion is running: a cron task or the back-office conversion ran in the last 48 hours.
Click Open Automatic conversion and add the cron address to your hosting’s cron jobs (Cron task). If you cannot add a cron job, keep Convert while the back office is open on: images are then converted while you or a colleague work in the back office.
Click Finish the setup (when every step is met, the setup closes by itself). The message The first setup is finished. appears, and the Overview now opens with its answer, the key figures and the checks of the whole module (Overview: the answer and the checks).
Overview: the answer and the checks
The Overview answers one question first: does everything work? Under the answer come three key figures, the checks of the module and the automatic conversion. The checks test the module on your own shop, say what is wrong in plain words and lead you to the setting that fixes it.
This chapter describes the Overview once the first setup is finished or skipped; during the setup it shows the steps instead (First setup in five steps).
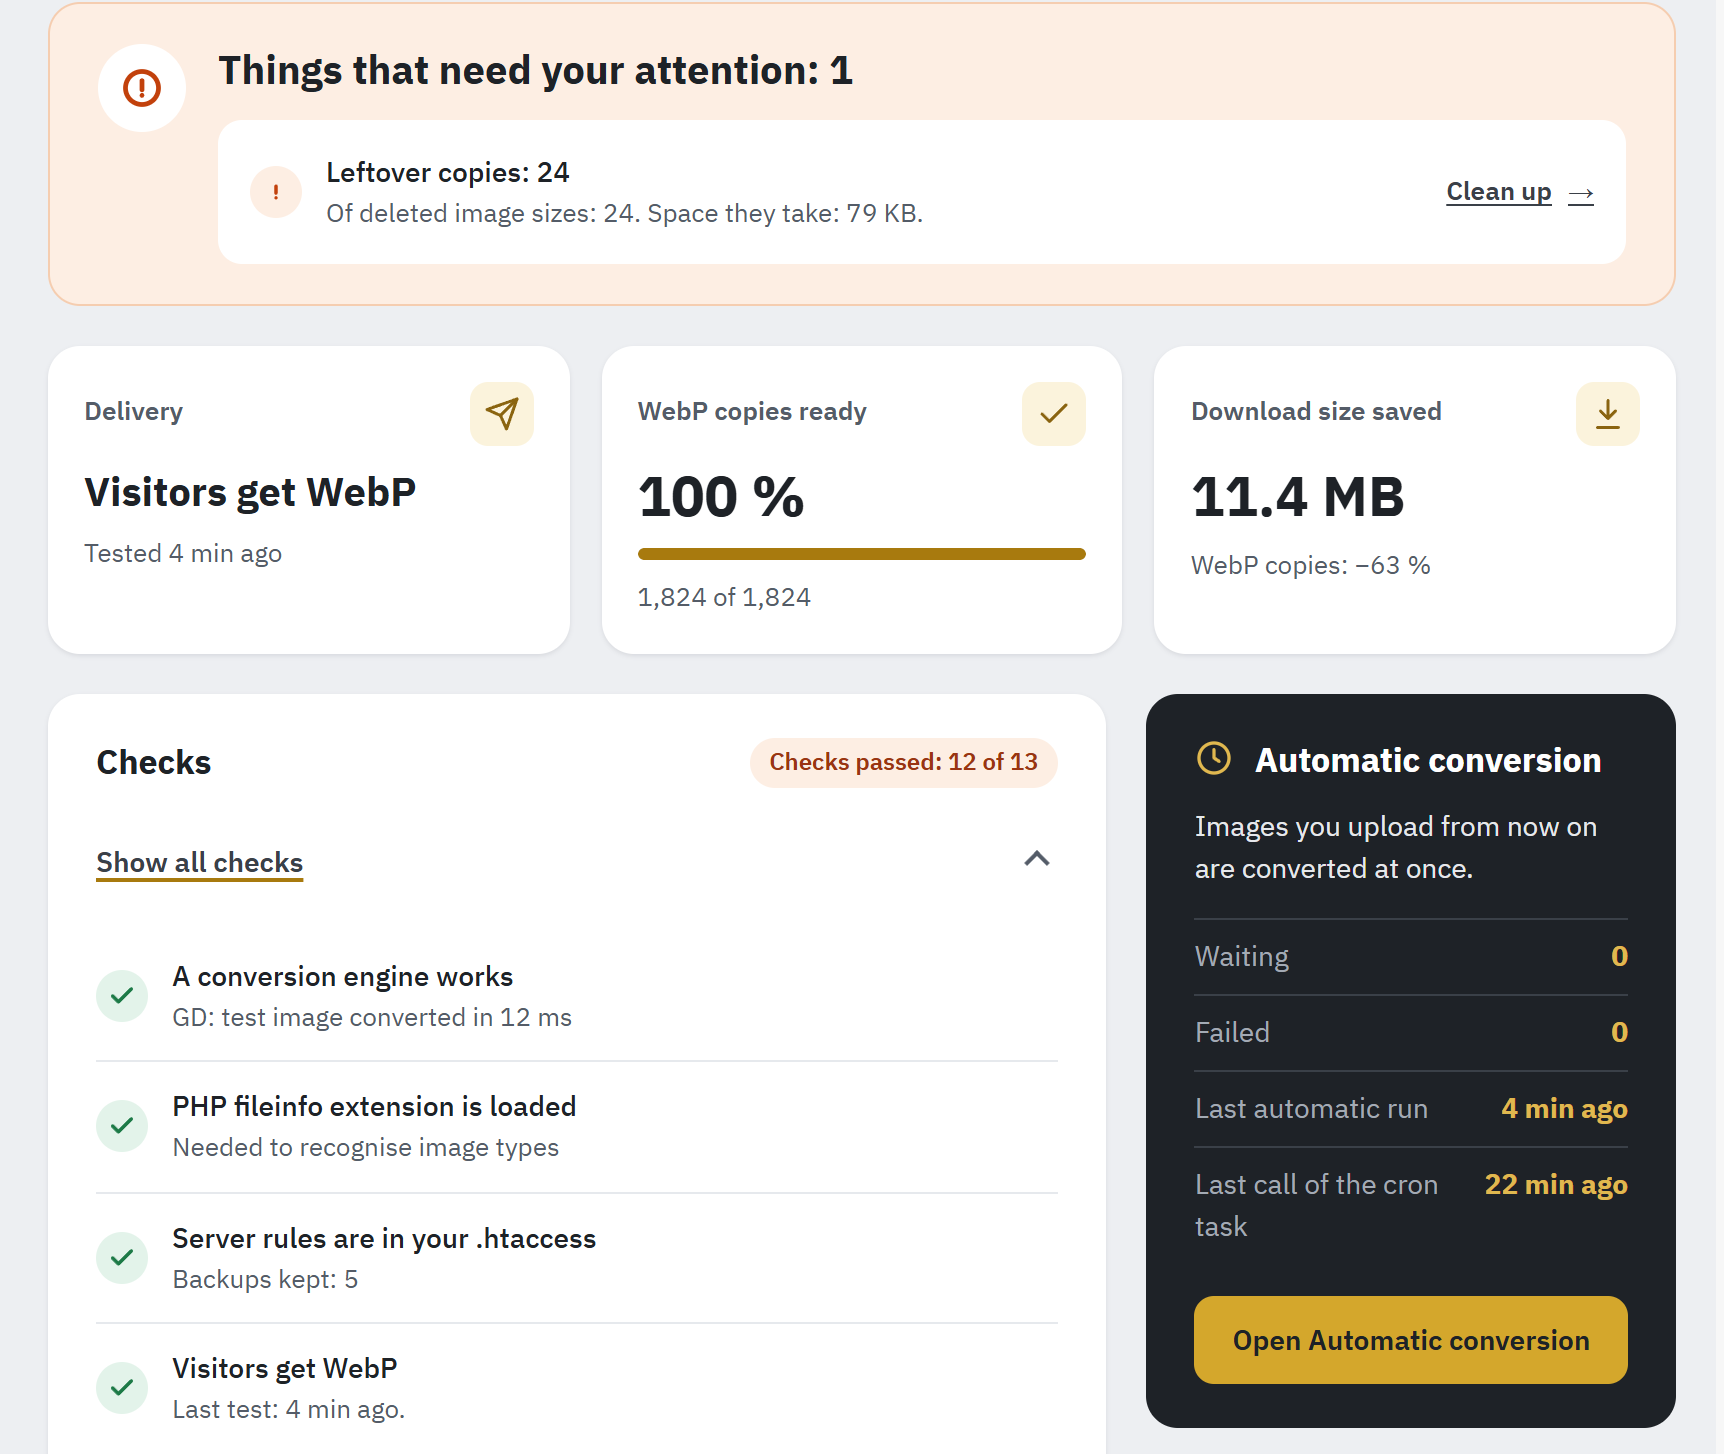
- The answer: everything works, or the things that need your attention, with their fixes.
- The key figures: what your visitors get, the WebP copies ready, the download size saved.
- How many checks pass.
- Show all checks opens and folds the list of checks.
- A check, with its result and its detail.
- The automatic conversion: images waiting, failed, the last runs.
The answer at the top
The Overview opens with one of two answers:
- Everything works., in green, with what the copies save, for example WebP copies are 12.4 MB smaller than the originals (−70 %). No check needs attention.
- Things that need your attention: 1, in orange (red when a check fails), with each check that needs attention: its title, its detail and the link that fixes it, such as Clean up or Test delivery. These are the same lines as in the Checks card, brought to the top.
The number is the one of the header’s badge Needs attention: 1, which leads to the Overview from every section (The header: state and facts).
Key figures
Three tiles under the answer sum up the shop:
| Tile | What it shows |
|---|---|
| Delivery | What your visitors get, in the words of the last delivery test, for example Visitors get WebP or Works on your server, and when it was tested, for example Tested 10 min ago. Its icon is gold when it works, orange when it needs a look, red when visitors get JPG or broken images. Before the first test it reads not tested yet; while no copy reaches the visitors, rules removed or not active (Delivery). |
| WebP copies ready | The share of your images that have their WebP copy, with a bar and the count, for example 1,791 of 1,791, and the copies still missing, for example WebP copies still missing: 25. A tick from 95 % up, an exclamation mark below. When AVIF is on, a line under it gives the AVIF copies, for example AVIF: 980 of 1,045, or AVIF: not available on this server. Instead of a figure: Off with the link Open Formats and quality, Not available with This server cannot create this format., The first conversion run lists the images of your shop., or No image to convert. |
| Download size saved | How much smaller the WebP copies are than their originals, all together (the AVIF copies when WebP is off), and the saving of each format, for example WebP copies: −70 %; No copy has been measured yet. before the first copies. |
Beside the Checks, the dark panel Automatic conversion says Images you upload from now on are converted at once. when the module converts each uploaded image, and shows the images Waiting for a copy, those Failed, the Last automatic run (orange when it never ran or not in the last 48 hours) and the Last call of the cron task (No run yet until the cron address is called; after two days, the date alone). Open Automatic conversion opens its section (Automatic conversion).
The checks
The head of the Checks card counts the checks that pass or only inform, for example Checks passed: 13 of 13: green when none needs attention, orange when one does, red when one fails. The list itself is folded: click Show all checks to open it, and again to fold it.
Each line has an icon: a tick when it passes, an exclamation mark when it needs attention, a cross when it fails, an “i” for information. Under its title, a detail says what was found. A line that needs work ends with a link, such as Fix, Set up, Turn on, Test delivery or Clean up, which opens the section where you change it. An information line needs nothing from you, even when it offers a link.
Reopen the setup steps, at the bottom of the card, shows the five setup steps again (First setup in five steps).
Some checks appear only when they apply: the EWWW check only with an EWWW key, the Vary check only while an address uses the server swap, the CDN check only when a CDN was seen in front of the shop, and the folder, hotlink, private-image and AVIF-size checks only when there is something to report. The table lists the title each check shows when it passes, and the titles you may see instead.
| Check (when it passes) | Other results | What to do |
|---|---|---|
| A conversion engine works | The conversion engine is not tested yet, The last test conversion failed, No engine on this server can create WebP copies | Run Test conversion in Engine. Without an engine, ask your host for GD or Imagick with WebP, or enter an EWWW key (Engine). |
| EWWW accepts the API key | EWWW refused the key: no credits left, EWWW refused the key: the key is not valid | Check the key and the credits of your EWWW account. Meanwhile the images EWWW converts wait. |
| PHP fileinfo extension is loaded | PHP fileinfo extension is missing | Ask your host to enable fileinfo. The module works without it. |
| Server rules are in your .htaccess, or on nginx The nginx configuration is in place | The server rules are missing from your .htaccess, The server rules cannot be written, You removed the image rules, Browsers do not get the copies yet, The nginx configuration changed, nginx swaps images it should no longer swap, The nginx configuration is confirmed; the .htaccess rules are missing | Click Write the rules in Delivery, add them by hand, or paste the nginx configuration again (Server rules, nginx configuration). Server rules are in your .htaccess with an exclamation mark means you switched the rules off: Write the rules again brings them back. |
| Visitors get WebP | Works on your server (information), Some images still JPG, Works, with one thing to check, Visitors get JPG, Broken images, CDN not checked, Not tested, Stopped, Delivery has not been tested yet, The last delivery test is more than 30 days old | The title says what the last delivery test found for your visitors, the detail when and why. Works on your server means the test ran inside your server, so a CDN or proxy in front of the shop was not checked. Otherwise run Test delivery, or open the last test with See the test and follow its answer (The answer). |
| Copies are sent with the Vary: Accept header | Copies are sent without the Vary: Accept header, The Vary: Accept header is not tested yet | Without this header a CDN or proxy may keep one version of each image for every browser. Turn on Apache’s mod_headers (ask your host), or set the address to Sources in the page (Copies are sent without the Vary: Accept header). |
| The server swap works through your CDN | The server swap has not passed the test through your CDN, Your CDN keeps one version of each image for every browser, Your CDN gets one version of each image | Run Test delivery. When the CDN keeps one version, the address uses Sources in the page; on Cloudflare, see CDN. |
| Feeds and shared links still get JPG images | Feeds and shared links are not tested yet, Feeds or shared links get another image format, The images of feeds and shared links could not all be checked | The delivery test checks them; See the test names the addresses. Google Shopping, Facebook and other sites may refuse another format. Look for another image service in front of the shop that converts images for every visitor (a CDN’s own image conversion, another WebP module); if there is none, contact us with the test result. |
| (appears only when needed) | Your file img/.htaccess lets browsers download listed file types only | That folder’s .htaccess file allows a list of file types: add webp and avif to its list (An image folder lets browsers download listed file types only). |
| (appears only when needed) | Your hotlink protection does not cover WebP and AVIF | Add webp and avif to the file types of your hosting’s hotlink protection (My hosting’s hotlink protection does not cover WebP and AVIF). |
| Your images have their copies | WebP copies still missing: 25, No image is listed yet, No image is chosen in Images to convert, WebP and AVIF copies are both off, No copy can be created on this server yet, Images that cannot get a copy because their folder’s .htaccess refuses the format: 12 | Convert the missing copies (Convert opens Convert images), choose images or turn a format on. Images refused by a folder: An image folder lets browsers download listed file types only. |
| (appears only when needed) | Images kept private by their folder, without a copy: 2 | Information: images that their folder keeps private get no copy, as a copy anyone can download would show them. |
| AVIF: AVIF is on | AVIF is off, AVIF is not available on this server | Information. Turn on opens Formats and quality; without AVIF on the server, ask your host (AVIF is not available on this server). |
| (appears only when needed) | Images too large for AVIF on this server: 3 | Information: images over 16 megapixels get a WebP copy only. |
| New images are converted when you upload them | New images are not converted when you upload them, The module is disabled in this shop | Reset the module in the Module Manager when its upload hook is missing; enable it in this shop when it is disabled. |
| Automatic conversion is running | Automatic conversion has never run, Automatic conversion has not run in the last 48 hours | Add the cron task, or keep the back-office conversion on (Automatic conversion). |
| No leftover copies | Leftover copies: 26 | Copies of deleted images or image sizes: delete them in Clean up (Clean up). While they take less than 50 MB and are at most 1 % of the copies, the line is only information. |
| The old address override is gone | The address override of version 2 is still in PrestaShop | Only after an upgrade from version 2: The address override of version 2 is still in PrestaShop. |
| (multistore only) | Conversion settings apply to all shops. | Information (Multistore and permissions). |
A check that could not run reads Could not be checked; the reason is in Advanced Parameters › Logs.
Coverage and savings
In the tile WebP copies ready and in the check Your images have their copies, an image counts as done when it has its copy, when PrestaShop or your theme already provides the file, or when its copy was not smaller (the original is then kept on purpose). The check passes from 95 % of the images of each format that is on.
What the copies save is said in the tile Download size saved and, when everything works, in the answer at the top. Only copies whose size the module measured count. Statistics has the details per kind of image and the disk space (Statistics).
When a folder’s .htaccess file refuses a format, a line under the checks says how many images cannot get a copy, for example Images that cannot get a copy because their folder’s .htaccess refuses the format: 12 (An image folder lets browsers download listed file types only).
The header: state and facts
The header at the top of every section shows the module’s state next to its name and version, and under them at most three short facts. The first state that applies is shown:
| State | What it means |
|---|---|
| Off in this shop | The module is disabled in this shop in the Module Manager. |
| Not working | A fact is red: no engine can create the copies, EWWW refused the key, WebP is not available on this server, or the last delivery test found that visitors get JPG or broken images. |
| Paused | No copy reaches your visitors: neither the server rules (on nginx, its configuration) nor the pages send them, for example after you removed the server rules (Delivery). |
| Needs attention: 1 | The module works, but checks of the Overview need attention; the number counts them. Click the badge: the Overview lists them at the top with their fixes. |
| Working | The module converts your images, the copies reach your visitors and no check needs attention. |
The facts read, for example, Visitors get WebP · All images have their WebP copy:
| Fact | What it tells you |
|---|---|
| What your visitors get | The result of the last delivery test, as in the Delivery tile: Visitors get WebP or Works on your server; in orange Some images still JPG, Works, with one thing to check, or Not tested, CDN not checked or Stopped when the test could not decide; in red Visitors get JPG or Broken images. Before any test: Delivery not tested yet; while no copy is sent: Delivery rules removed or Delivery not active. |
| The copies | All images have their WebP copy (All images have their WebP and AVIF copies when AVIF is on) once every image has them; else the count of each format, for example WebP 1,045 of 1,791 (58 %) and, when AVIF is on, AVIF 980 of 1,045. Instead of a count: off, not available on this server (red for WebP) or no image listed yet. |
| What needs a look | Only when it applies: Module disabled in this shop, Engine none or Engine EWWW refused the key (red), Automatic conversion never ran or a last run more than 48 hours ago (orange). |
When more than three facts apply, the least serious are left out: first a fact without colour, such as the AVIF count, then the orange ones. The state still counts them all, and the checks of the Overview say what to do. On a phone the header shows the state and the first two facts.
Notes from the installation
When something could not be done during the installation or the upgrade, a card Notes from the installation appears at the top of the Overview, above the answer. For example:
- The image rules could not be written to the .htaccess file during the installation. The shop addresses use Sources in the page until the rules are written in Delivery.
- The module could not prepare its data folder during the installation. Make the folder
var/modulesof the shop writable for the web server. - Your .htaccess file still holds the WebP Generator lines you pasted by hand from version 2. Remove that block of lines: the module now writes its own rules (Upgrade from version 2).
Once you have read or fixed them, click Dismiss these notes.